Table of Contents
- 3.13.1. Adding projects
- 3.13.2. Project Lifetime and Deletion
- 3.13.3. The Manual Testing Area
- 3.13.4. The Manual Test Management Tab
- 3.13.5. The Manual Test Executions Configuration Tab
- 3.13.6. The Manual Test Execution Overview Tab
- 3.13.7. The Manual Test Execution View
- 3.13.8. Manual Test Import Wizard
Squish Test Centers Manual Testing feature allows you to manage your manual test step descriptions and provides a way to execute those manual tests as well as track their results in Squish Test Centers result views. You can view the results of your manual tests right next to the results of your automated tests.
To start with Manual Testing you first need to select or create a project. If you already manage your test results in Squish Test Center you could use the same project you use for your automated test results. Otherwise the following section will show you how to create a new project.
There are two approaches to create a new Squish Test Center project. One approach is to enter a new project name during Squish test results upload. This is described in Manual Upload via the Squish Test Center UI (Section 3.5.2). But this approach is not suitable for a new project that will be dedicated to manual tests. An alternative approach is the subject of this chapter. A new Squish Test Center project can be created by clicking the button from the project dropdown in the navigation bar. This approach is suitable for both manual and automated test projects.
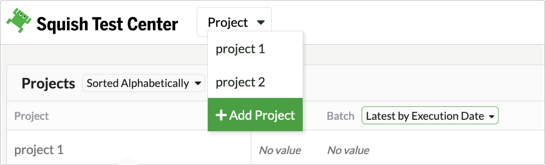
A modal dialog with an input field for the project name will be shown. The project name should be unique. If the name already exists an error message will be shown.

Once the project name has been entered and the button has been clicked, a new project is created in the Squish Test Center database. After creating a project there are two ways to proceed.
Upload automated test results.
Open a test management page and start adding manual tests.

Squish Test Center does not allow for projects to be deleted directly, but will remove projects automatically as soon as they
- do not contain any results,
- have no traceability associations with foreign projects,
- and are not connected to any repository.
Admins can remove results by using the or actions in the Explore View, or configure the automatic deletion of results after a set time, see Project Actions (Section 3.10.2). Look for the relevant integration settings on the Global Settings page to remove project associations.
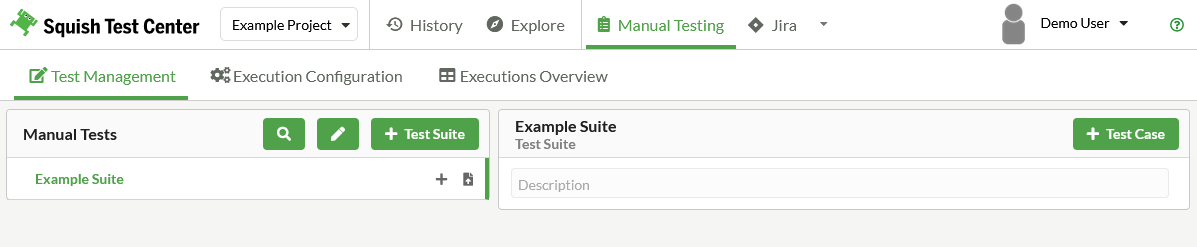
After a project was selected, the Manual Testing area can be found in the top menu bar, right next to the Explore View and History View.

In the Manual Testing Area you will find 3 sub sections provided as tabs: the Test Management, Execution Configuration, and Executions Overview. Each will be detailed below.
Table of Contents
- 3.13.4.1. Create Test Suites
- 3.13.4.2. Create Tests
- 3.13.4.3. Adjust Test Names
- 3.13.4.4. Adjust Test Hierarchy
- 3.13.4.5. Import Manual Tests
- 3.13.4.6. Search Test Cases and Scenarios
- 3.13.4.7. Manage Test Details
- 3.13.4.8. Manage Steps
- 3.13.4.9. Reuse Existing Steps
- 3.13.4.10. Change Step Details
- 3.13.4.11. Other Step Actions
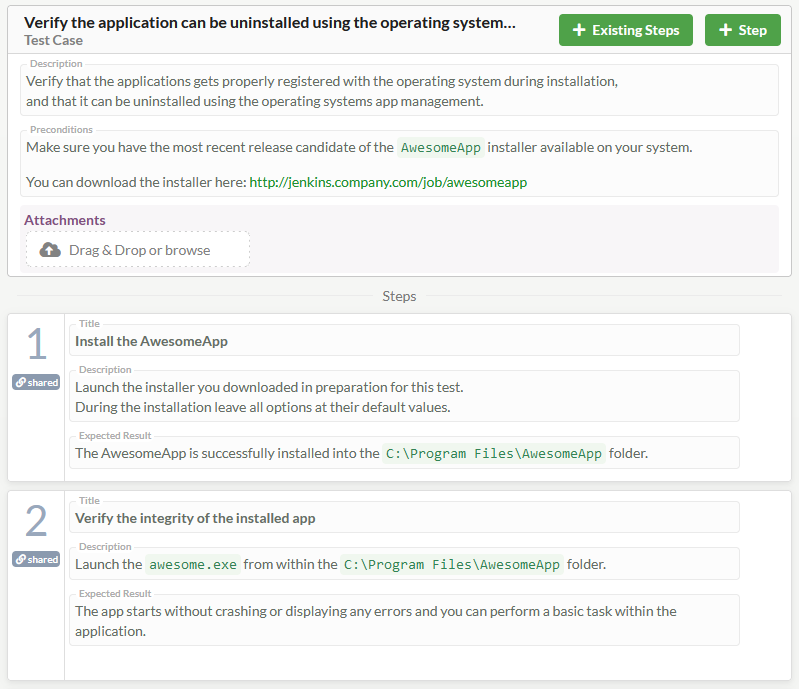
In the Test Management tab you can create and maintain your manual test steps and descriptions. The Test Management tab is divided into two panes. The left pane is used to create and maintain the test hierarchy. Here, you can create test suites, test cases, features and scenarios. The right pane is used to edit the description and preconditions of test cases and scenarios. It is also used to create and manage the individual test steps.
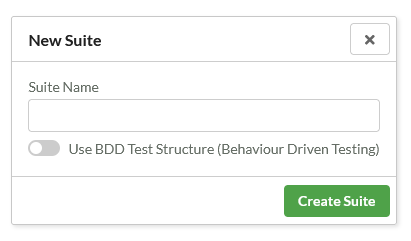
In the Test Management tab on top of the
left pane you can find the button labeled
+ Test Suite which can be used to add new
test suites. Clicking the + Test Suite
button will reveal a creation dialog where you can specify a
name for the test suite. You also need to select whether the
suite should Use BDD (Behaviour Driven Development) structure.
Choosing BDD will create the following hierarchy
Suite > Feature > Scenario > Step.
If you don’t choose BDD, the hierarchy will be
Suite > Test Case > Step.
![[Note]](images/note.png) | Notes |
|---|---|
You can not change the type of the suite (BDD or Regular) after it has been created. Furthermore, if you plan to import tests, you should know that the Xray and Zephyr imports only work with non BDD suites, while the Upload Feature File only works with BDD suites. |
After the test suite has been created, it will show up as a selectable item within the left test management pane.
You can create tests within a test suite either by clicking on the icon next to the test suite entry within the left test management pane, or you can select a test suite in the left test management pane which will reveal a + Test Case within the header of the right hand side test details pane (+ Feature and + Scenario for BDD tests).
If you want to adjust the name of a Test Suite, Test Case, Feature or Scenario you can select the test element within the left test management pane and afterwards hover over the name -- this will reveal the inline editing option.
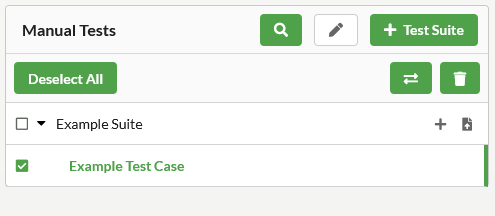
If you want to adjust the test hierarchy by removing or relocating tests there are multiple approaches to achieve this. If you want to relocate tests, the easiest approach is to enable the Edit Mode by clicking the pencil icon, which you can find within the header of the left test hierarchy pane, right next to the suite creation button.
Moving tests or changing the test order
If you have enabled the Edit Mode you can select test cases, features and scenarios by selecting the checkbox infront of the test item. Once you have selected all items that should be moved, you can use the move button above the test hierarchy. The move button will be grayed out if multiple different types of tests are selected (those would need to be moved separately). Once the move button is pressed a move dialog is opened that will allow you to select the test suite or feature to which the selected test items should be moved.
If you just want to adjust the order of test cases, features and scenarios you can simply select the test suite or feature within the hierarchy that contains the tests you want to reorder. That will reveal the test items within the right hand side details pane. Once you hover over a test item in the details pane, that will reveal a green side bar menu on the right hand side of the test item. Within the side menu you will find up & down arrow buttons to move the test item up or down.
Moving and reordering can also be achieved by using drag & drop on the test hierarchy elements within the test hierarchy pane on the left hand side.
Removing Tests
If you have enabled the Edit Mode you can select test suites, test cases, features and scenarios by selecting the checkboxes infront of the test items. Once you have selected all items that should be removed, you can use the remove button above the test hierarchy to remove the items.
To remove test cases, features and scenarios you can also select the test suite or feature, that contains the item that you want to remove, from the test hierarchy pane. That will reveal the test items within the right hand side details pane. Once you hover over a test item in the details pane that will reveal a green side bar menu on the right hand side of the test item. Within the side menu you will find a remove button to remove the test item.
If you want to import existing manual tests from other test management systems, Squish Test Center currently supports importing Manual Tests from Zephyr and Xray. Furthermore Squish Test Center supports importing Feature Files as well. To import tests you have to first create a test suite. In the left test hierarchy pane you will find an import button next to every suite entry. The import button will take you to the import wizard. Learn more about importing manual tests using the import wizard here: Manual Test Import Wizard (Section 3.13.8)
If you have many Test Cases or Scenarios it might be difficult to locate them in the left test hierarchy pane. At the top of the left pane you will find a search button (symbolized by a magnifying glass) next to the + Test Suite button. Using the search button will reveal a search input field that you can use to lookup the test cases and scenarios you are looking for.
When you select a test case or scenario, the right hand side details pane will show the details of the selected item.
Edit Test Description & Precondition
At the top of the details pane you can edit the description and precondition of a test. You can format the text by using markdown notation. When you click on a text edit field, this will reveal some editing option at the bottom right side of it. You can undo and redo changes, abort the editing, or save the changes. The changes you make are also saved automatically once the text edit field loses focus. The undo controls are intended to prevent unwanted changes and accidental progress loss.

Furthermore you can use the markdown button in the lower left corner of the edit field to display a markdown formatting help.
Upload Attachments
Underneath the description and precondition of a test
element, you will find an attachments section. You can use
the button labeled
Drag & Drop or browse to upload
attachments for the selected test. Images that are attached
can be displayed within description or precondition text by
using the markdown notation
 where
filename.jpg is the full name of the
attachment.
For test cases and scenarios the test details pane lets you add steps to your tests. You can add steps by using the + Step button in the top right corner of the test details pane. Using the + Step button will append a new step to the end of the list of steps.
Just like Squish tries to make it easy to reuse existing automated steps in automated BDD tests, Squish Test Center also tries to make it very easy to reuse existing manual test steps. This can be used for procedures and actions that are similar between different test cases.
Next to the + Step button in the top right corner of the test details pane you will find the + Existing Steps button. The button will open the existing steps dialog in which you can browse all previously created steps.
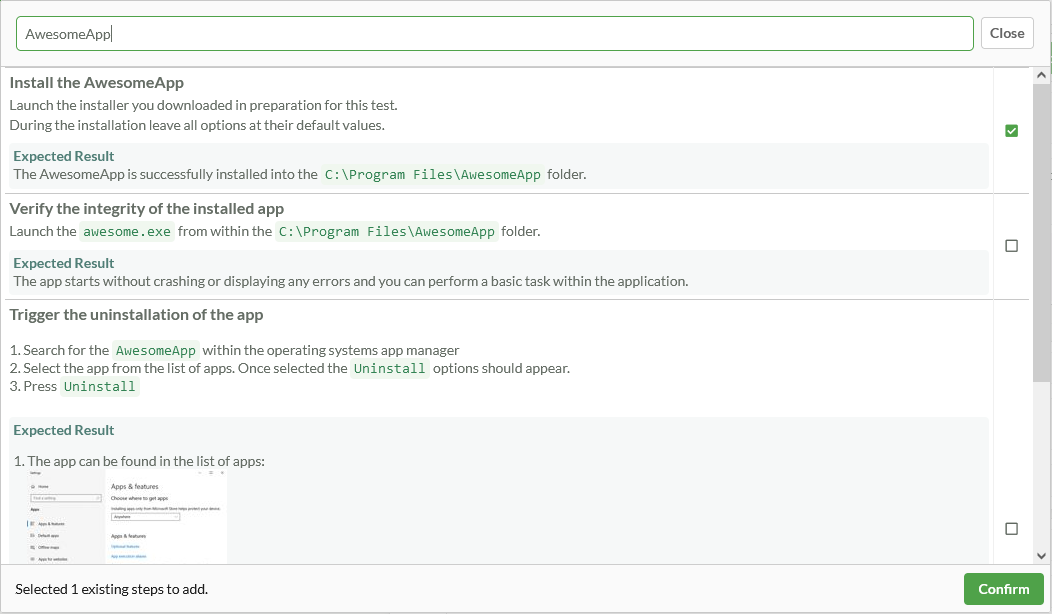
You can use the search bar at the top of the dialog to look for the steps you want to reuse. Once you have found a step you want to reuse, you can use the check box next to the step to select it. You can also select multiple steps. After you have selected all steps you want to reuse you can press the button at the bottom of the dialog to append the selected steps at the end of the list of steps.
Each step consists of a Title, Description, Expected Result and Attachments.
The Title should just be a short summary of what should be tested or done as part of the test step, as it will become part of the test hierarchy. The title will later be shown within the Explore View (Section 3.2) and History View (Section 3.3) that are optimized to show short test hierarchy names.
The Description field is a more detailed description of what needs to be tested and done as part of the test step. The description text can be formated using markdown to create lists, show links, highlight important details or to display in line images.
The Expected Result field should be used to describe what the outcome of the actions described in the Description should be. It should contain all information required for the tester to determine whether the step result should be considered a pass and was executed successfully and or not.
To add attachments to a step you need to use your mouse to hover over the step, this will reveal a green side bar menu on the right hand side of the step. Within the step menu you will find the upload attachment button. Once you have added at least one attachment you will also be able to upload attachments via the Drag & Drop or browse button that is revealed within the section that shows all step attachments. The attachment section should be located underneath the Expected Result field.
Just like with Test Case and Scenario descriptions and
preconditions, you can use markdown notation to include
uploaded images in the Description or
Expected Result
(i.e.  where
filename.jpg is the full name of the
attachment). You can reference step attachments but also
attachments of the Test Case or Scenario.
When you hover over a step with your mouse this will reveal the green step menu.
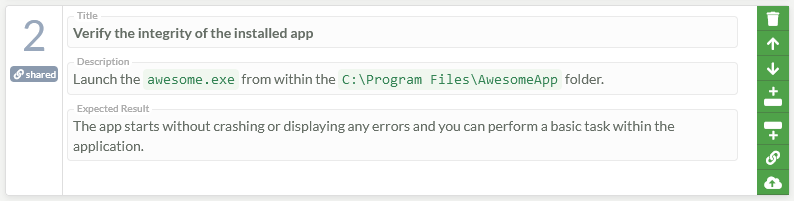
The step menu allows you to perform the following actions
Remove Steps: At the top of the step menu you’ll find the button to remove a step
Move Steps: You can use the up and down arrows to change the order of steps
Add Steps: Each step offers the actions to Add Step Above and Add Step Below. This can be used to insert steps in between two existing steps.
Upload Attachments: Can be used to upload attachments to a step (See Change Step Details (Section 3.13.4.10) section for details).
Replace Step: You can replace each step with another existing step. If you use this function the existing steps dialog will open, in which you can browse all previously created steps. If you select a step in the existing step dialog the selected step will be inserted into the list of steps instead of the step you were originally calling this action on.
Note Please be aware that this will remove the step you called the action on in favor of the selected existing step.
Table of Contents
The Execution Configuration tab can be used to create executions of your manual tests. That means adding manual test executions to a manual test cycle (batch), selecting on which configurations the tests need to be executed on, and which users should execute the test.
At the top of the Execution Configuration tab you will find the Configure Execution section.
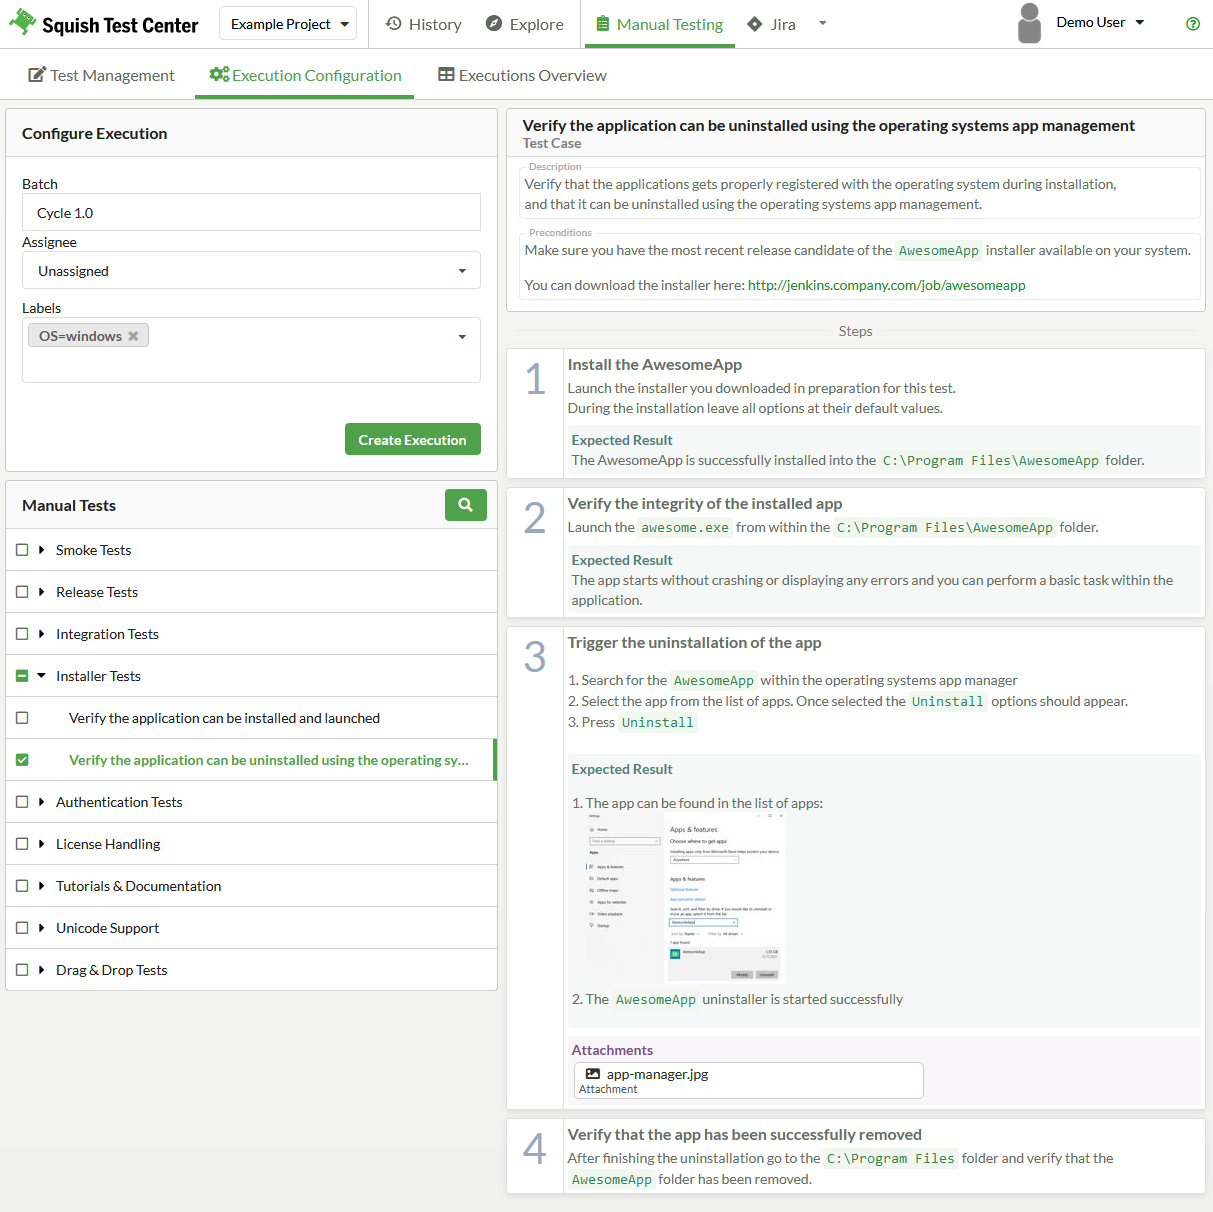
Here you can specify the batch name which is used to identify the test cycle. So all manual test executions that belong to the same test cycle should typically get the same batch name as well.
You can use the Assignee dropdown menu to select the Test Center user that should perform the manual test. The selected user will be notified by email. You can postpone the decision on who should perform the manual test and do it later on the The Manual Test Execution Overview Tab (Section 3.13.6) page or from within the The Manual Test Execution View (Section 3.13.7).
The Labels dropdown menu can be used to specify the configuration a manual test should be executed on. The dropdown menu can be used to select existing label value combinations or to create new label value combinations. Typically you would use this to specify on which operating system, browser or device a manual test should be executed on. This mechanism works exactly like it does for automated test results. It is important to assign meaningful labels to be able to later analyze the results in the explore and history view.
Below the Configure Execution section you will find the exact same layout as an the Test Management tab, the only difference being that the test details pane on the right hand side is read only and the test hierarchy pane on the left hand side now offers check boxes to selected the test cases and scenarios you want to execute.
Use the left hand side test hierarchy pane to select the test suites, test cases or scenarios you want to include in the test cycle you are preparing. Once you select a test item within the hierarchy pane, the right hand side test details pane will give you more information about the test and its steps.
You can use the search button on top of the test hierarchy pane to look up the relevant manual tests.
Once you have marked a manual test for execution the Configure Execution section will reveal the Create Execution button in its lower right corner. Use this button to finalize the creation of the manual test run.
| Note |
|---|---|
One manual test execution can only contain a single suite. If you select multiple suites the Create Execution button will automatically create one execution per selected suite |
You should think of a manual test execution like a work item, so in most cases it will not make sense to include every manual test in a single manual test execution. Tests that are not directly related and could be worked on by multiple people should ideally become part of individual test executions.
Table of Contents
The Execution Overview tab can be used to start manual test executions, get an overview of the current status of a test cycle or to assign users to specific test executions.
The view consists of an overview table that will show all manual test executions that are currently in progress as well as already finished manual test executions. The view can either show all executions that belong to a specific batch or that fall within a specific timeframe. These two modes can be activted via a selection menu in the top right corner of the execution table.
When the selection menu is set to Batch:, then all executions are shown that match the batch name that was entered in the input field next to the selection menu.
When the selection menu is set to Range:, then the date range can be freely configured via the date selection input fields next to the selection menu.
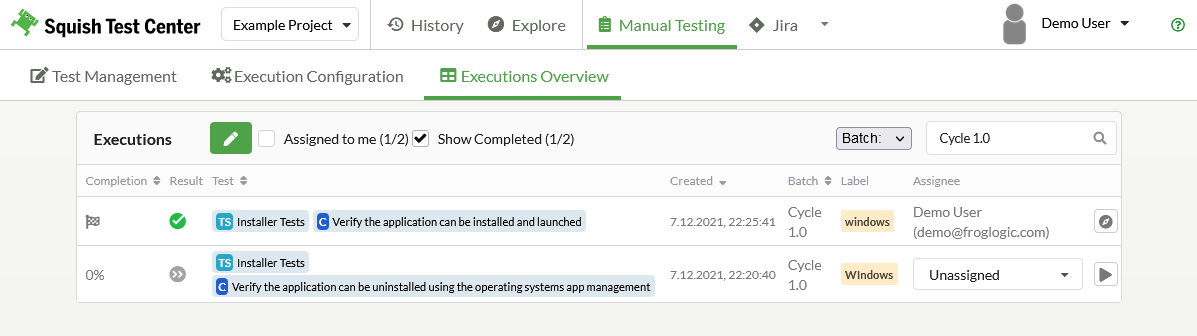
Finished manual test executions are marked with a flag icon in the Completion column. Manual test executions that still can be worked on show up with a completion percentage within the Completion column.
The Result column shows the current state of the manual test execution, so as soon as any kind of failure is encountered it will show the failed icon. The skipped icon will be shown as long as no step has been finished or as soon as a step has been marked as skipped. The passed icon will be shown as long as at least one step is marked as passed and all other steps are either also marked as passed or not marked at all.
Which Test Suites, Test Cases and Scenarios are part of the test execution is displayed in the Test column.
When a manual Test Execution was created from within the Execution Configuration tab can be seen in the Created column.
The Batch column shows which Test Cycle a manual test execution belongs to, while the Label column shows which configurations should be applied during the manual test execution.
Which user is assigned to a manual test execution can be seen in the Assignee column. The Assignee column provides dropdown menu that allows you to change to which user a manual test execution is assigned to. However for finished test runs the assignee can no longer be changed.
The last column contains a link to the manual execution for all unfinished executions, which is visualized by the play icon. For finished executions the last column contains a link to the explore view, which is visualized with the compass icon.
So to start working on a manual test execution you should first take a look at the assignee column and check which executions are already assigned to you or currently do not have any assignee. Next you should check which Test Cycle / Batch currently needs to be worked on and which Tests are to be executed on which configurations. By clicking on the play button in the very right most column you can switch to the The Manual Test Execution View (Section 3.13.7) for the selected manual test execution and start working on the test steps.
You can enable the Assigned to me checkbox at the top of the table, which will simplify the view by only showing executions that are assigned to you.
If you want to get an overview of the overall progress for the current test cycle you should select the Show Completed checkbox, which will show both completed and unfinished manual test executions.
To remove or copy manual test executions you first need to enable the Edit Mode by pressing the button labeled with the pencil icon that you will find in the top left corner of the executions table header. Once the Edit Mode is enabled action buttons will be displayed right underneath the table header and checkboxes will be displayed infront of every manual test execution.
Remove Executions
When the Edit Mode is active you can select all executions that you want to remove by using the checkboxes infront of each manual test execution. Pressing the action button labeled with the delete icon right underneath the table header will initiate the deletion. Afterwards you will be prompted to confirm the deletion.
Copy Executions
To make it easy to repeat a test cycle the Execution Overview also allows to copy manual test executions. For all copied executions the assigned user will initially be set to Unassigned. When the Edit Mode is active you can select all executions that you want to copy by using the checkboxes infront of each manual test execution. Pressing the action button labeled with the copy icon right underneath the table header will open the copy dialog. In the copy dialog you need to specify the name of the batch(test cycle) to which the executions should be copied to. Confirming the copy dialog will finish the copy operation.
Table of Contents
The Execution View lets you work through the individual steps of a manual test execution.
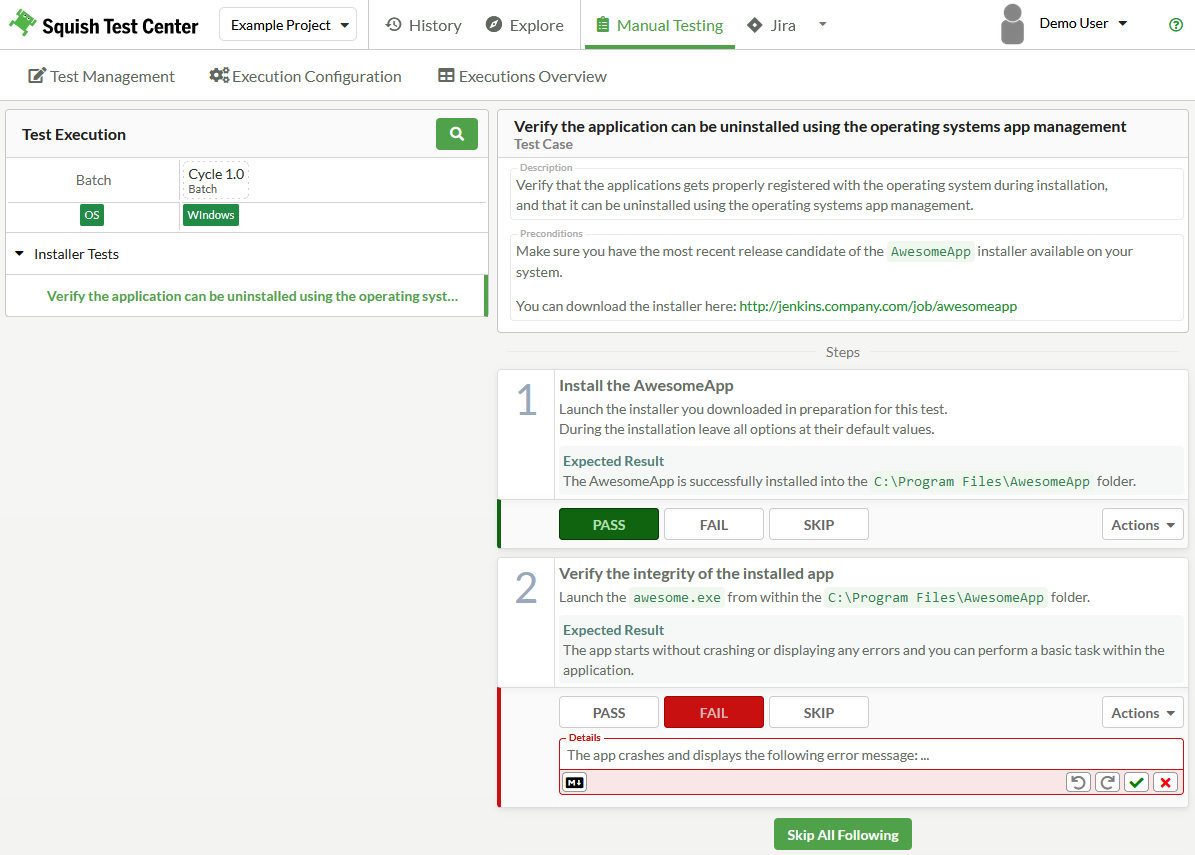
The layout is very similar to the Test Management and Execution Configuration pages.
The test hierarchy pane on the left hand side will show only the test cases and scenarios that are part of the currently selected manual test execution. It can be used to navigate between test cases and scenarios.
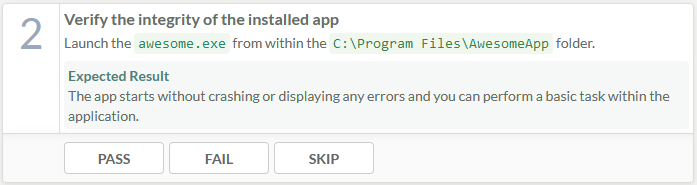
The test details pane on the right hand side will show the testcase or scenario descriptions and preconditions, as well as the list of steps that need to be worked through as part of the manual test execution. For each step you should follow the instructions given in the Title and Description of a test and compare the outcome to what is described by the Expected Result section and possibly to references provided as Attachments.
Manual test steps need to be performed in the correct order, therefore manual test steps will be rendered inactive and faded out when the previous step does not yet have a test status assigned.
Below each active manual test step there are 3 buttons to track the outcome of a step execution. Use the PASS button if you could follow the instructions and the outcome matches the described Expected Result, use the FAIL button if you could not follow the instructions or the described Expected Result deviates from what you observed. If a previous step already failed you can use SKIP for the following steps. There might be additional cases where skipping a step might be necessary you should carefully decide on a case by case basis if skipping a step might be acceptable.
Once you have passed, failed or skipped a step, an Actions dropdown will appear in the lower right corner of the step. Here you can chose to Add Details which will make a Details input field appear, where you can describe what you have observed during the execution. Furthermore you can chose the option Upload Attachment which will allow you to upload files related to the execution and which will make a Result Attachments section appear. There are no set rules for how to use the result details, but two examples would be that you can use these two input fields to provide reproductions for failures that occurred or to archive results produced by the AUT during the manual test step execution.
When you have configured Squish Test Centers JIRA integration (see Integration for Atlassian JIRA (Section 4.4)) then the step Actions dropdown will also give you the option Create Jira Issue. Using this option you can create JIRA issues for problems you have encountered during the manual test execution.

Within the dialog you can specify all required fields.
After the JIRA issue has been created it will be linked to the manual test and also to the manual test results. Once JIRA issues have been linked to a manual test, a Jira Associations section will be displayed within the manual test step. The listed associations link back to your JIRA instance, so that you can easily jump back and forth between Squish Test Center and JIRA.

You can use the x button that is attached to the JIRA issue representation within the Jira Associations section to remove issue associations.
Once a manual test is finished the issue associations also get transferred to the manual test results. That means the next time the manual test is executed you can use the Traceability Views (Section 3.11) to update the associated JIRA issues with the most recent test results.
If you encounter a failure or need to skip a step there will appear a Skip All Following button underneath the step you just skipped or failed. Pressing the button will set the status of all following steps in the test case or scenario to SKIP.
If you have worked through all steps of a test case or scenario and there are still other test cases or scenarios that need to be completed there will be a button at the very bottom of the execution overview that lets you jump to the next scenario that still has open steps. That same button will also appear underneath the last step you changed the status of.
You can of course also simply select the next scenario in the left hand side test hierarchy pane.
Once all steps of all test cases and scenarios of the current manual test execution have been completed or assigned a status there will be a button at the very bottom of the execution overview that lets you finish the manual test execution. This button will also appear underneath the last step you have changed the status of.
If you finish a manual test execution you can no longer change any of the step status or any of the descriptions. The result will be written into the result database. This is also the moment when the result will become available in the Explore View (Section 3.2) and History View (Section 3.3).
After you have finished an execution two buttons will appear. The button labeled Back to Overview will take you back to the The Manual Test Execution Overview Tab (Section 3.13.6). The button labeled Go to Report will take you to the Explore View (Section 3.2) Single Report Page.
If you are looking at a manual test execution that is not assigned to yourself you will not be able to change the step results, the , and buttons will be disabled. However at the very top of the there should be an info toast that contains a link to assign the execution to yourself.

Table of Contents
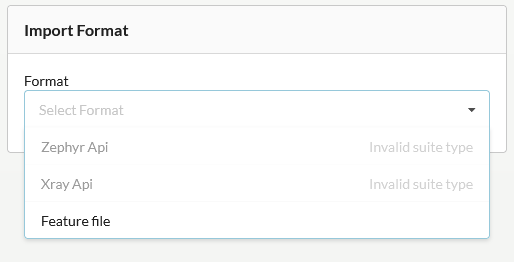
If you want to import existing manual tests from other test management systems, Squish Test Center currently supports importing Manual Tests from Zephyr and Xray. Furthermore Squish Test Center supports importing Feature Files as well. To import tests you have to first create a test suite. In the left test hierarchy pane you will find an import button next to every suite entry. The import button will take you to the import wizard.
First you will be prompted to select the Import Format. The Feature File import is only available for BDD Test Suites, while the Zephyr API and Xray API imports are only available for non-BDD Test Suites.
After selecting the Feature File import the wizard will prompt you to select the feature file from your locally available files using your operating systems file selection dialog. Once the file has been selected it will be automatically uploaded and imported. Any features, scenarios and steps contained in the feature file will be turned into a manual test hierarchy. The feature file import expects the same gherkin syntax that is supported by Squish.

The Zephyr and Xray imports make use of Squish Test Centers traceability features, therefore you should first make sure that you have configured the corresponding integrations within the global settings (see Integration for Zephyr (Section 4.5) or Integration for Xray Test Management for Jira (Section 4.6))
After selecting the Zephyr or Xray import, the wizard will prompt you to select the project from which you wish to import manual tests. In the next step the import wizard will display all tests that are available for import.
| Note |
|---|---|
Please note that for Xray only tests that have the Manual type are supported. Xray Cucumber tests currently cannot be imported. |
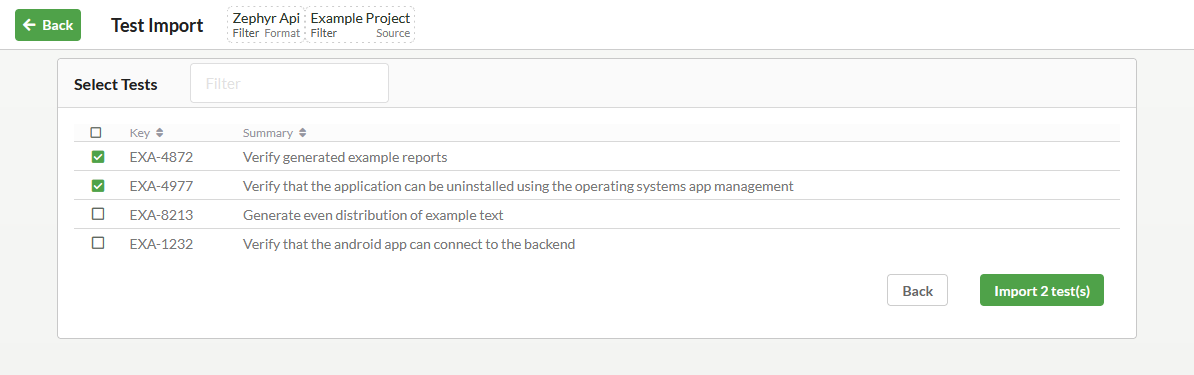
Select the checkboxes infront of all tests that you would like to import. You can use the text input field above the tests table to filter the list of tests and more quickly find the tests you are looking for. Once you have selected all tests that you would like to import you can use the Import tests button in the bottom right corner of the tests table to start the import process.