Table of Contents
Atlassian JIRA has broad use cases, including release planning and management, bug tracking and sprint planning for agile teams. The JIRA Integration is used to automate the pushing of test results from Squish Test Center to JIRA. The JIRA Integration allows you to manually map JIRA issues to Squish Test Suites/Cases. This mapping allows for automated tasks within the JIRA platform. For example, automatically opening a defect ticket if a test uploaded to Squish Test Center has failed.
To use the JIRA integration of Squish Test Center, log in to Squish Test Center and hover over the user icon in the top right corner of your screen, and choose Global Settings. The integration can be enabled within the Jira tab via the toggle button next to Jira Integration.
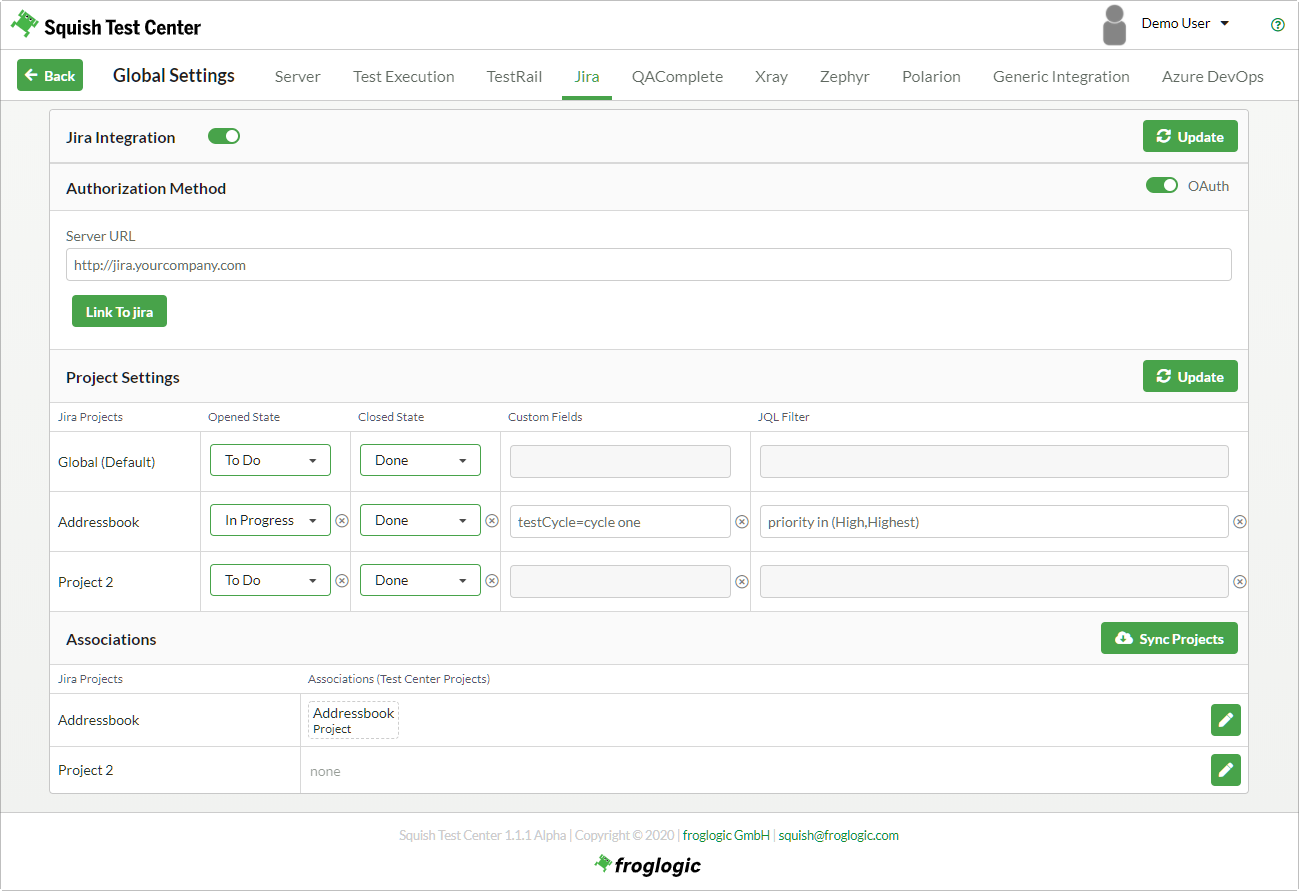 |
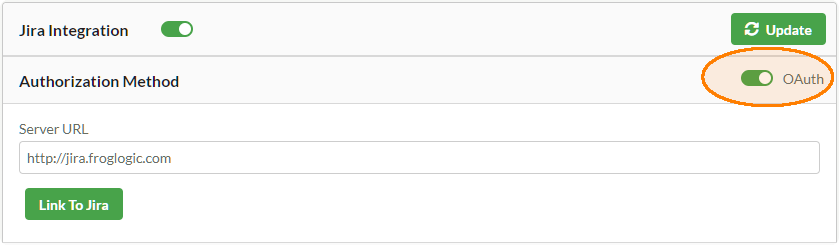
The Squish Test Center JIRA integration supports Basic Authentication as well as OAuth 1.0a. You can use the toggle button next to Authorization Method to switch between the supported methods.
 |
When using Basic Authentication, you need to provide the login credentials of the account that Squish Test Center should use to connect to your JIRA instance. The used account needs to have the necessary rights to access the project list and issue tickets.
- Server URL
URL of JIRA instance
- Username
JIRA username
- Password
JIRA password
 |
![[Note]](images/note.png) | OAuth Authentication |
|---|---|
Before you can connect to your JIRA instance via the OAuth Authentication method, you need to setup an Application Link on your JIRA instance. Please read JIRA OAuth Setup (Section 4.4.2.4) for detailed instructions on how to add a Squish Test Center Application Link to your JIRA instance. When using the OAuth 1.0a authentication method you need to provide the base url of your JIRA instance. |
- Server URL
URL of JIRA instance
After entering the JIRA instance URL you first need to save it by pressing the Update button in the top right corner of the integration settings.
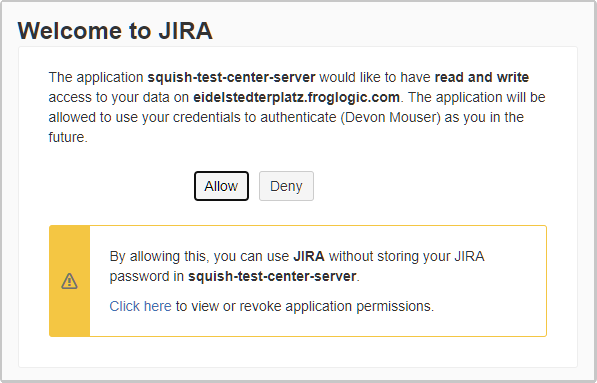
Afterwards you can use the Link to JIRA button to authenticate with your JIRA instance. When the Link to JIRA button is clicked, Squish Test Center will redirect you to JIRA where you can log in with the JIRA account that you want to link to your Squish Test Center account. As soon as you have successfully logged in to JIRA please confirm the read and write access for Squish Test Center by pressing the Allow button.
By filling the Project
Settings 'Default (Global)' row,
default values (used by all JIRA projects) can be set. To configure
specific settings per JIRA project, you can override these defaults
via filling rows of each project which should use different settings.
 |
- Opened State
When your JIRA projects use non-standard workflow definitions, the Opened State dropdown box can be used to configure what state a JIRA issue should be set to, when an associated test fails.
- Closed State
The Closed State dropdown box can be used to configure what state a JIRA issue should be set to, when all associated tests are passing.
- Filter
This field expects a custom JQL-Query. You can use this setting to select only a specific subset of Tickets which should be synchronized with Squish Test Center.
 |
The Associations settings can be used to specify which JIRA Projects should be mapped to which Test Center Project. You have to select a Test Center Project in the Project dropdown which will reveal which JIRA Projects are associated to the currently selected Test Center Project. To change the association of a JIRA Project simply click on it.
If no JIRA Projects are listed, you can use the button to retrieve the current list of JIRA projects from your JIRA instance.
Table of Contents
The synchronization between Squish Test Center and JIRA can be used to achieve traceability so you can easily jump back and forth between both systems and it can be used to transfer test result information to JIRA.
Pulling causes information about the Issue Tickets in JIRA to be transferred to Squish Test Center. Once the information is in Squish Test Center you can manually map which Squish Tests are associated with which Issue Tickets. Once the associations have been made, you can get an Overview in Test Center of your Issue Tickets and the associated Test Status.
Furthermore this allows you to push Test Results to JIRA. A failed result will put the JIRA ticket into a failed state (based on the workflow settings) while a passed result will put the JIRA ticket into a resolved state. Furthermore the Description of each linked ticket will be extended with a list of Backlinks to the related test results.
Note that you can also use the testcentercmd commandline tool to perform the push and pull actions (see Upload via the command line (Section 3.5.3)).
Pulling mappable entities from the external system:
Navigate to a batch of a project and select the Jira integration via the Traceability Dropdown Button in the navigation bar. Pull entities from the associated foreign integration project by clicking . You should now see a table with entries from your integration.
To map Squish Test Center tests to your integration entities, click the button of a table entry on the rightmost Mapping column. Select tests to associate in the dialog and click .
For most integrations, you would want the accumulated result to be pushed to your integration system for viewing. If you have mapped an entity from your integration to Squish Test Center tests, you can manually push the results of the current batch by clicking the button.
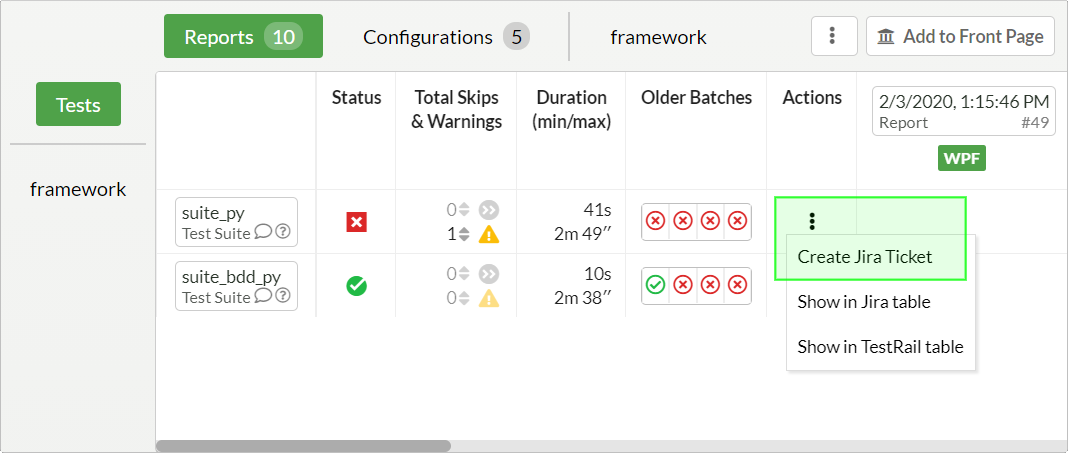 |
When creating tickets from Squish Test Center, the Title of the created tickets
will be Test Center Created Bug for test suite followed by the
name of the test item selected in Squish Test Center.
 |
To be able to use the OAuth 1.0a authentication method, you first need to create a Squish Test Center Application Link within your JIRA instance.
First you need the public RSA-Key of Squish Test Center. Log in to Squish Test Center and hover over the user icon in the top right corner of your screen, and choose Global Settings. In the Server Settings (Section 3.9) tab you will find the Public RSA-Key. Copy this key to your clipboard.
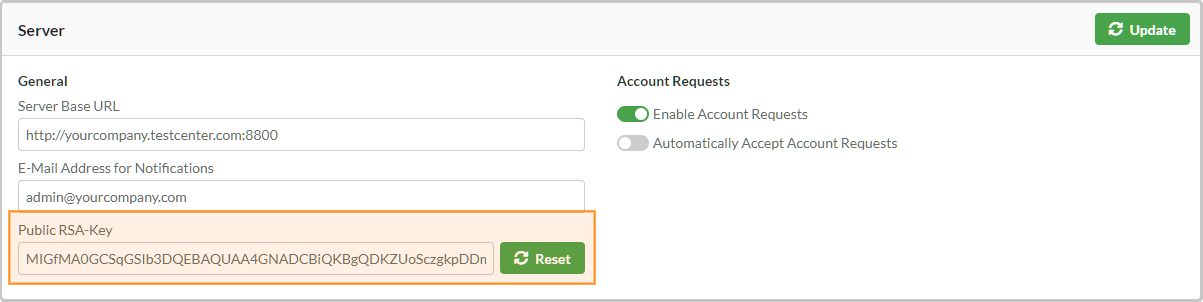 |
Location of Squish Test Center public RSA-Key
Next, log in to the JIRA platform with administrative rights and go to the JIRA System Administration page.
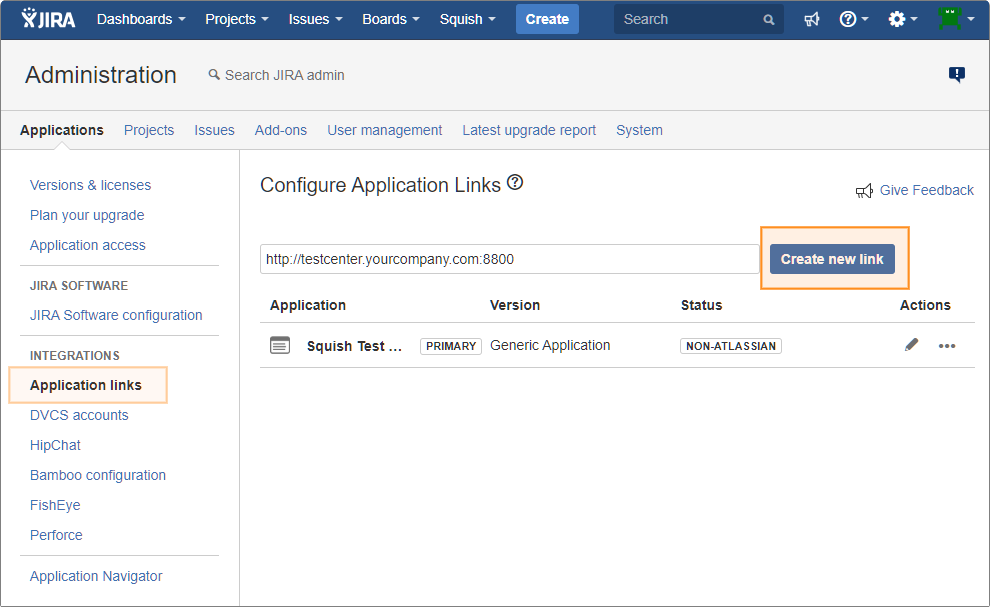 |
On the administration page select the category Applications and choose the entry Application Links from the Integrations side menu. In the Configure Application Links section, enter the URL of your Squish Test Center instance and click the Create new link Button.
 |
Application Link setup dialogs.
This should open the Link applications Dialog. How to fill out the dialog is detailed below.
Application Link
- Application Name
Human readable name of the linked Application. Set this to
Squish Test Center- Application Type
Set the type to
Generic Application- Service Provider
Name of the company which serves the application (e.g. your company's name)
- Consumer Key
Set this to
squish-test-center-oauth1- Shared Secret
Set this to
squish-test-center-secret- Request Token URL
Set this to
/oauth/v1/rtoken- Access Token URL
Set this to
/oauth/v1/atoken- Authorization URL
Set this to
/oauth/v1/author- Create incoming link
This option must be checked
Confirm these settings by pressing Continue. This should open another Dialog. How to fill out this second dialog is detailed below.
Creating Incoming Link
- Consumer Key
Set this to the same value as in the previous dialog:
squish-test-center-oauth1- Consumer Name
Set this to
squish-test-center-server- Public Key
Set this to the RSA-Key you copied from Squish Test Center at the beginning of these Instructions ( JIRA OAuth Setup (Section 4.4.2.4))
Finish the setup process by pressing Continue. Your JIRA instance should now be setup to allow OAuth authentication from Squish Test Center.