Table of Contents
There are many ways to upload results to Squish Test Center, which are detailed in the sections below. For more details on how to pick Batch names and Labels see How to Group Results (Section 3.6)
Note: labels starting with a "." will be hidden across the UI, they are only shown on the label configuration page of a report, see Single Report View (Section 3.2.2.2) Squish Test Center uses these kinds of labels to control the behavior of 3rd party integrations. The values for these labels have no further analytical value.
One exception being the .reference.url label. When set,
on the Batch View (Section 3.2.2.1) a link is added in
the column header for this upload (Report),
pointing to the .reference.url value. When this label
has the format [title](url), link title is taken as text for
the added link, otherwise Ref is taken.
The following result formats can be uploaded to Squish Test Center:
Squish XML
When you have no further attachments you can simply upload the
results.xmlgenerated by Squish, but if your result contains screenshots, snapshots or attachments please upload the entire result folder as a zip archive. We recommand to use xml report version 3.4 but older versions are supported as well.Squish HTML
When you have no further attachments you can simply upload the
data/results-v1.jsgenrated by Squish, but if your result contains screenshots or snapshots please upload the entire result folder as a zip archive.Squish Coco CSMES/CSEXE
You can upload a single Squish Coco instrumentation database (*.csmes) per report, together with a number of corresponding execution reports (*.csexe).
JUnit, CppUnit and other xUnit formats.
To upload your results manually using the Squish Test Center UI, you will first need to be logged into a user account with upload privileges. Next, hover over the User icon and name in the top right corner, and from the dropdown, choose Result Upload. You should see a page like the one below:
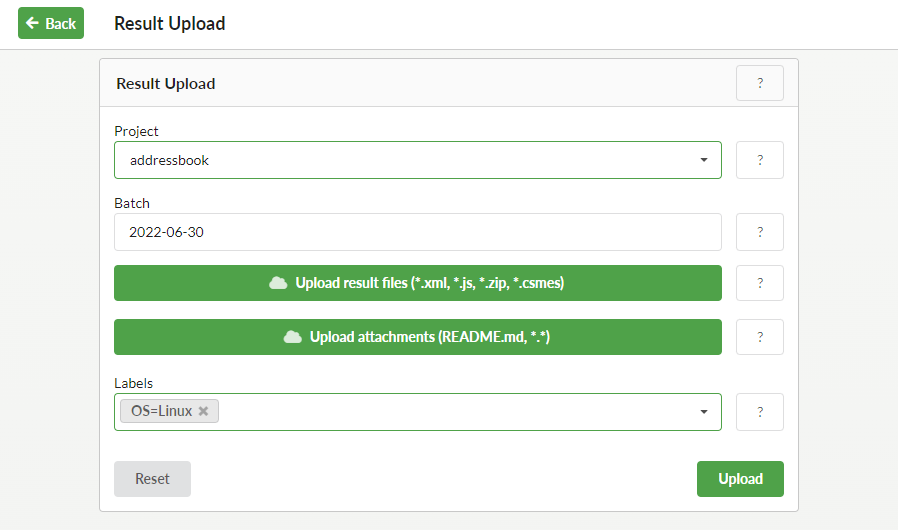
From here, you can choose which project to add results to. All existing projects can be
viewed in the project dropdown. Alternatively you can type a new project name and press
. This will create a new project on result upload. The other way to create a new
project is described here: Adding projects (Section 3.13.1). After selecting a project, enter
a name for the Batch, and select a .zip, .xml,
.js, or a single .csmes file to upload.
You can select multiple .csexe files together with a .csmes,
which Squish Test Center will combine into a single coverage report.
Optionally, you can upload arbitrary files as attachments to these results.
Finally, use the bottom box to select or add labels to the result, so that the results can be more easily selected from Reports and Tests.
There are 2 ways to upload results to Squish Test Center by command line.
Option 1: From testcentercmd on the command line
For those users looking to upload their results by using the command line, the executable testcentercmd shipped with Squish Test Center is needed.
When invoking testcentercmd, the following are required:
an upload token (Creating and Managing Upload Token (Section 3.7.1)) or email and password of a Squish Test Center user with upload privileges
project name that identifies tests of the same software, project or module
path to the test result file or the result directory
The following are optional:
URL of the server instance, the default being
http://localhost:8800.One or more labels to filter the test results of the same project, the default being
none.Name of batch instead of a generated name
Example usage:
$ testcentercmd --url=http://localhost:8800 --token=MyToken upload Myproject
/path/to/results.zip --label=version=1.0.0 --label=OS=Linux --batch=MyBatch
While it is recommended to use an upload token (Creating and Managing Upload Token (Section 3.7.1)),
it is also possible to authenticate with email and password using the command arguments
--user=user@company.com and --password=password
(Note that if the password argument is omitted, you will
be prompted for your account password upon entering this command).
To see the full list of options to testcentercmd,
issue testcentercmd --help in a prompt.
![[Note]](images/note.png) | Note |
|---|---|
You can also use the testcentercmd commandline tool to perform traceability actions (like pushing or pulling data from or to the external system) for integrations you have set up on Squish Test Center. Currently supported integrations (used as integration names) are: generic, reqif, jira, testrail, qacomplete, azure, polarion, xray, zephyr Example: $ testcentercmd --url=http://localhost:8800 integration push --integration=testrail --project=MyProject --batch=MyBatch
|
Option 2: Upload a report from squishrunner
Uploading test results of a squishrunner test suite execution is a two-step process.
First, use the testcenter report generator for squishrunner.
squishrunner --reportgen "testcenter,http://localhost:8800/project/Myproject?token=MyToken&label=version%3D1.0.0&label=OS%3Dlinux&batch=MyBatch"
You must also specify either --local or a running
squishserver instance as well as a testsuite to be run via --testsuite.
The label and batch are optional.
See Creating and Managing Upload Token (Section 3.7.1) on how to create a token.
Note that for labels, the equal sign (=) for the label value in the URL must be
escaped and becomes %3D.
After squishrunner is finished, you should see the
IMPORT_ID. With that, you can later add labels and/or add
attachments to the report.
| Note |
|---|---|
Currently on Linux the number of parallel connections to Squish Test Center is limited to 300.
Keep this limit in mind when you run many tests in parallel, and plan on using the
|
Once you have obtained an IMPORT_ID either from
the result upload or from the Explore View (Section 3.2) you can use this ID
to upload additional attachments.
testcentercmd --user=johndoe@mycompany.com addIMPORT_ID--attachment=MyFile1--attachment=MyFile2
Within Squish IDE, navigate to the topmost menu bar, and choose
Window - Show View - Other. In the filter text field,
search for Squish Test Center, then click
.
Clicking on the blue settings dial button in the top right corner of the Squish Test Center View will open the server dialog, where you can specify your Squish Test Center instance.
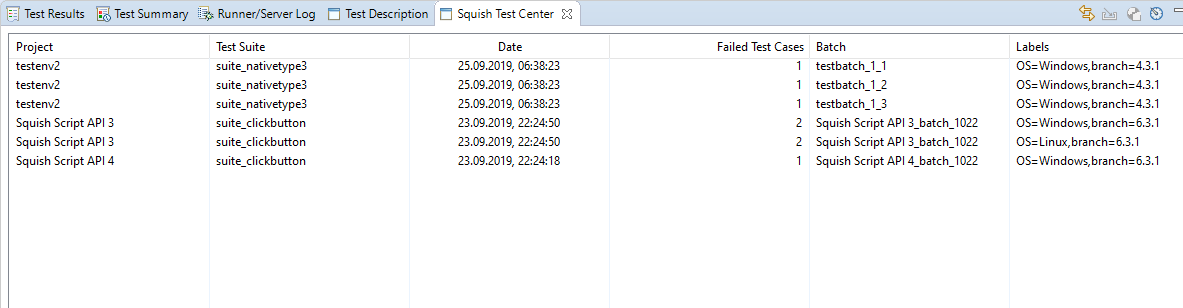 |
Once a Test Center Instance is setup within the IDE the actual result upload can be found in the top right corner of the Test Result View.
 |
Next, you will need to configure an instance of the server. Click on the Configure Squish Test Centers icon, click to , and in the dialog presented, enter the server URL, email and password, and click .
How to configure the Jenkins Plugin to upload to Squish Test Center is part of the Plugin documentation: Jenkins Plugin Documentation
Table of Contents
Squish Test Center plugin for TeamCity adds functionality to send results to Squish Test Center (referred as Test Center). Results need to be obtained from an Agent as Artefacts and are send to Test Center from TeamCity Server. Squish Test Center tab is added to a Build Page containing a link to view results in Test Center. The plugin can be integrated with Squish Runner plugin (version 2.4 and above), where Squish Runner plugin is responsible for executing Squish tests and Squish Test Center plugin is responsible for sending them to Test Center.
The plugin is available from: download.froglogic.com/resources/testcenter-teamcity-latest.zip. To install the Squish Test Center plugin shut down TeamCity server and copy the zip archive with the plugin to TeamCityData Directory/plugins directory. Finally, start the TeamCity server: the plugin files will be unpacked and processed automatically. To check where the TeamCity Data Directory is located go to Administration, next Global Settings page. To verify that the plugin is installed go to Administration and choose Plugins List. Squish Test Center plugin shall be listed in External Plugins list.
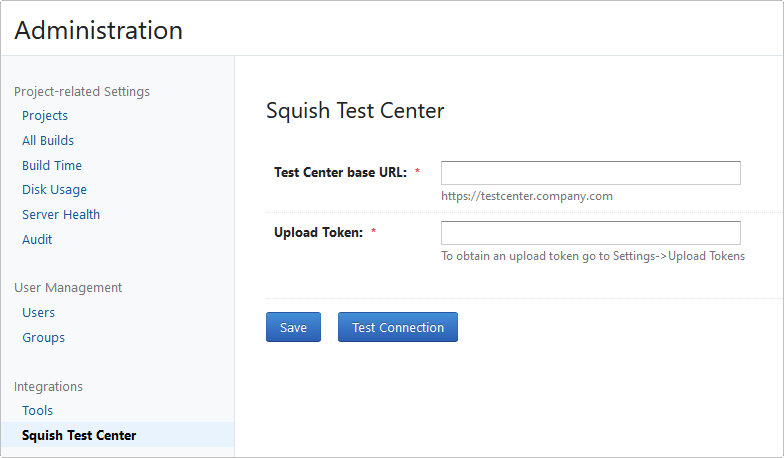
The first step is to provide information to TeamCity about Test Center installation.
Go to Administration page and open Squish Test Center page
Provide Test Center base URL and Upload Token
Click the Test Connection button to verify that data you entered is correct
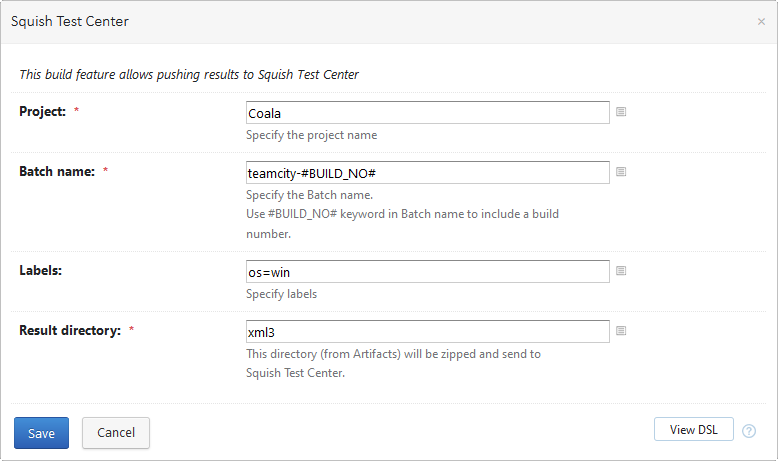
Next step is to configure Build Configuration to send results to Squish Test Center
Edit Build Configuration Settings
Go to Build Features
Click Add build feature
Choose Squish Test Center Build Feature
Provide Test Center Project Name, Batch name, Labels and Result Directory. If Squish Results are being sent and Squish Plugin is used to run tests, then put "xml3" as Result Directory.